In this tutorial series, We will create a custom connector for RASA in Python. Rasa currently provides the following ways to connect it’s chatbot to the outer world.
- Rest
- Telegram
- WhatsApp via Twilio
- Facebook Messanger
- RocketChat
- Slack
- Hangout
- and many more
But there are many channels such as discord, connecting to whatsapp directly, viber, Instagram etc for which rasa does not provide the way to connect it’s chatbot.
That’s where custom connectors comes in action. They provide you the way to add your channel which does not have Rasa support yet and let you interact with the chatbot via that channel.
We are going to create a simple custom connector which will give you an idea on how to implement it for your own need.
Prerequisites
- Python3.6 or higher: If you are new to python, follow this Python Basics
- Rasa: boilplate for Rasa can be found here How to Create a ChatBot using Rasa and Python — A Step-by-Step Guide (Simple)
Code Section
Assuming you now have the rasa boilerplate with you, The code structure should look like this for now
Code language: Python (python)├───.rasa │ └───cache │ ├───tmp5gf32et5 │ └───tmp7313lxkq ├───actions │ ├───__pycache__ │ └─── actions.py ├───data ├───models ├─── config.yml ├─── credentials.yml ├─── domain.yml ├─── endpoints.yml └───tests
Now that we have the boiler-plate with us, create a folder and name it as custom_channels in the root directory. This is where we will keep all of our custom channels.
Create a python file and name it as first_channel.py. We will add our code in this file for our custom connector. Once you have the file, Add the following code in it. Make sure all the dependencies are available otherwise it will raise an error while running it along with Rasa server
import asyncio
import inspect
import logging
from sanic import Sanic, Blueprint, response
from asyncio import Queue, CancelledError
from sanic.request import Request
from sanic.response import HTTPResponse
from typing import Text, Dict, Any, Optional, Callable, Awaitable, NoReturn

import rasa.utils.endpoints
from rasa.core.channels.channel import (
    InputChannel,
    CollectingOutputChannel,
    UserMessage,
)

logger = logging.getLogger(__name__)

class MyFirstCustomConnector(InputChannel):

    @classmethod
    def name(cls) -> Text:
        """Name of your custom channel."""
        return "first"

    def blueprint(
        self, on_new_message: Callable[[UserMessage], Awaitable[None]]
    ) -> Blueprint:

        custom_webhook = Blueprint(
            "custom_webhook_{}".format(type(self).__name__),
            inspect.getmodule(self).__name__,
        )

        @custom_webhook.route("/", methods=["GET"])
        async def health(request: Request) -> HTTPResponse:
            return response.json({"status": "ok"})

        @custom_webhook.route("/webhook", methods=["POST"])
        async def receive(request: Request) -> HTTPResponse:
            sender_id = request.json.get("sender") # method to get sender_id
            text = request.json.get("text") # method to fetch text
            input_channel = self.name() # method to fetch input channel
            metadata = self.get_metadata(request) # method to get metadata

            collector = CollectingOutputChannel()

            # include exception handling
            try:
                await on_new_message(
                    UserMessage(
                        text,
                        collector,
                        sender_id,
                        input_channel=input_channel,
                        metadata=metadata,
                    )
                )
            except CancelledError:
                logger.error(
                    f"Message handling timed out for " f"user message '{text}'."
                )
            except Exception:
                logger.exception(
                    f"An exception occured while handling "
                    f"user message '{text}'."
                )

            return response.json(collector.messages)

        return custom_webhook
Code language: Python (python)
Let’s discuss code
Rasa mandates that we should have the following in any custom connector
A custom connector class must subclass
rasa.core.channels.channel.InputChanneland implement at least ablueprintandnamemethod
- We have imported all the required libraries that we need to create a custom connector
- We have named our custom connector
MyFirstCustomConnectorand it is inheriting fromInputChannel.
- We have
namemethod which is used when we call our custom connector via webhook API call. Wea are naming our connector asfirst.
- There are two endpoints under
Blueprintmethod, first one checks for the health of the connector and second one interacts with Rasa chatbot model with our query
Your custom connector is ready to be connected with Rasa chatbot. To do that, we will add the path to our custom connector channel in the credentials.yml file present in the root directory. It will look like this
# This file contains the credentials for the voice & chat platforms
# which your bot is using.
# https://rasa.com/docs/rasa/messaging-and-voice-channels

rest:
#  # you don't need to provide anything here - this channel doesn't
#  # require any credentials

custom_channels.first_channel.MyFirstCustomConnector:
#  # you don't need to provide anything here - this channel doesn't
#  # require any credentials


# This entry is needed if you are using Rasa X. The entry represents credentials
# for the Rasa X "channel", i.e. Talk to your bot and Share with guest testers.
rasa:
  url: "http://localhost:5002/api"

Code language: Python (python)
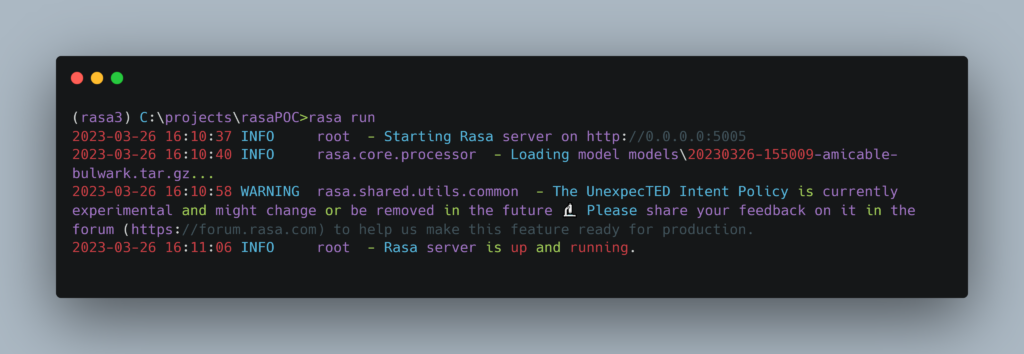
After adding the path to our custom connector, restart the rasa server if it is already running or just start it via this command: rasa run in the root directory terminal. You will get something like this on your terminal if there is no error.

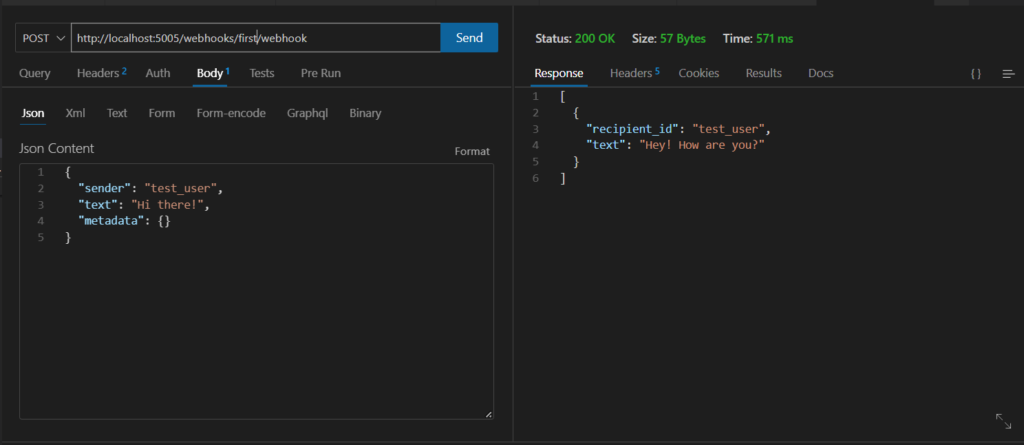
If you get this, it means your rasa is active and we can test whether our custom connector is working or not. All the request to rasa are made in this format https://<RASA_URL>/webhooks/channel_name/webhook
So in order to test our channel, we will replace the channel_name with our channel name which is first, Open POSTMAN, Thunderclient to test it, it will look like this

It worked!! Custom connector is working and interacting with rasa 😀 In the next tutorial in this series, we will try to connect to a service which is not available at rasa yet via custom Connector.
Full code of this project can be found at Rasa custom connectors in Python, feel free to give it a ⭐


