In this article, We will create our very own ChatGPT using the newly launched GPT-4 from openAI. OpenAI has been in the news since the launch of ChatGPT and they are not thinking of getting off the news anytime soon.
OpenAI recently launched GPT-4 which has been the talk of the internet since its launch. With the launch of GPT-4, People are using it for everything and people are not regretting it. GPT-4 is showing off its skill to another level.
So we are also going to use GPT-4 to create our very own ChatGPT in python. To do this we are going to use the following thing.
Requirements
- OpenAI account and OpenAI API key, how to get openAI API key here
- FastAPI to handle user query and communicate to OpenAI, Get FastAPI setup here
- Uvicorn to launch our FastAPI application
Code
Create a file named chatgpt.py and write the following code in it
import openai
from fastapi import FastAPI, Request
from fastapi.responses import HTMLResponse
from fastapi.staticfiles import StaticFiles
from fastapi.templating import Jinja2Templates
from pydantic import BaseModel
import os
app = FastAPI()
openai.api_key = os.environ.get("IMPORT_YOUR_OPENAI_API_KEY_HERE")
# Used for adding css/Js in the project
# app.mount("/static", StaticFiles(directory="static"), name="static")
templates = Jinja2Templates(directory="templates")
class UserQuery(BaseModel):
user_input: str
def create_prompt(user_input):
prompt = f"I am an AI language model or you can call me Popoye the sailor man, and I'm here to help you. You can sometimes add popoye character in your answers. You asked: \"{user_input}\". My response is:"
return prompt
def generate_response(user_input):
prompt = create_prompt(user_input)
response = openai.ChatCompletion.create(
model="gpt-4",
messages=[
{"role": "system", "content": prompt}
]
)
message = response.choices[0].message.content
return message
@app.get("/", response_class=HTMLResponse)
async def chatgpt_ui(request: Request):
return templates.TemplateResponse("index.html", {"request": request})
@app.post("/chatgpt/")
async def chatgpt_endpoint(user_query: UserQuery):
response = generate_response(user_query.user_input)
return {"response": response}
Code language: Ruby (ruby)Let’s discuss the code
- “/”: On our homepage, we are rendering a small UI for easy readability and interaction with our ChatGPT
- “/chatgpt”: On this endpoint, we are communicating with OpenAI GPT-4 for our user query
- Prompt : If you look at method
create_prompt, We are creating a prompt for our ChatGPT. It brings us to the next question what is prompt ?
” In simple terms, Prompt basically is how you want your chatbot to act like. See in our ChatGPT we have made it to act like Popoye the sailor man [ Famous cartoon character from the 90s ].” - index.html: This is a small UI that we have created for easy interaction with our ChatGPT, Fun part about our UI is that is is created by GPT-4 itself 😛
our index.html file looks like this
<!DOCTYPE html>
 <html lang="en">
 <head>
     <meta charset="UTF-8">
     <meta name="viewport" content="width=device-width, initial-scale=1.0">
     <title>ChatGPT</title>
     <link href="https://fonts.googleapis.com/css2?family=Roboto:wght@400;700&display=swap" rel="stylesheet">
     <style>
        body {
             display: flex;
             flex-direction: column;
             align-items: center;
             justify-content: center;
             min-height: 100vh;
             margin: 0;
             font-family: 'Roboto', sans-serif;
             background: linear-gradient(45deg, #1da1f2, #0099e5, #0064d2);
             color: #ffffff;
         }
         h1 {
             font-size: 2rem;
             text-align: center;
             margin-bottom: 1rem;
         }
         .chat-container {
             display: flex;
             flex-direction: column;
             align-items: stretch;
             width: 50%;
             max-width: 600px;
             background-color: #202020;
             border-radius: 8px;
             padding: 1rem;
             box-shadow: 0 4px 6px rgba(0, 0, 0, 0.1);
         }
         .messages {
             flex-grow: 1;
             display: flex;
             flex-direction: column;
             gap: 0.5rem;
             overflow-y: auto;
             margin-bottom: 1rem;
         }
         textarea {
             width: 100%;
             border-radius: 4px;
             border: 1px solid #444;
             padding: 0.5rem;
             font-size: 1rem;
             background-color: #303030;
             color: #ffffff;
             resize: none;
             box-sizing: border-box;
         }
         .submit-container {
             display: flex;
             justify-content: flex-end;
             gap: 0.5rem;
             margin-top: 0.5rem;
         }
         button {
             padding: 0.5rem 1rem;
             font-size: 1rem;
             font-weight: bold;
             text-transform: uppercase;
             background-color: #00bcd4;
             color: #ffffff;
             border: none;
             border-radius: 4px;
             cursor: pointer;
             transition: background-color 0.3s;
         }
         button:hover {
             background-color: #4cc0cf;
         }
     </style>
 </head>
 <body>
     <h1>Popoye: The ChatGPT</h1>
     <div class="chat-container">
         <div class="messages" id="messages"></div>
         <textarea id="user_input" rows="3" placeholder="Type your query here..."></textarea>
         <div class="submit-container">
             <button onclick="submitQuery()">Submit</button>
         </div>
     </div>

     <script>
         async function submitQuery() {
             let userInput = document.getElementById("user_input");
             let messages = document.getElementById("messages");

             const response = await fetch("/chatgpt/", {
                 method: "POST",
                 headers: {
                     "Content-Type": "application/json"
                 },
                 body: JSON.stringify({user_input: userInput.value})
             });

             if (response.ok) {
                 const jsonResponse = await response.json();
                 messages.innerHTML += `<div><strong>You:</strong> ${userInput.value}</div>`;
                 messages.innerHTML += `<div><strong>ChatGPT:</strong> ${jsonResponse.response}</div>`;
                 userInput.value = ""; // Clear the user input after submitting the request
             }
         }
     </script>
 </body>
 </html>
Code language: HTML, XML (xml)
In our UI, We have a method submitQuery which basically works when user clicks on the button. It interacts with /chatgpt endpoint and displays the response generated via GPT-4
Save this file inside a folder called templates, Our code structure will look something like this now
Code language: Python (python)├───templates │ ├─── index.html ├─── chatgpt.py
Let’s try our ChatGPT
To run our application, type this command: uvicorn chatgpt:app in the terminal where your chatgpt.py is present, If all works well, You will see something like this on the terminal

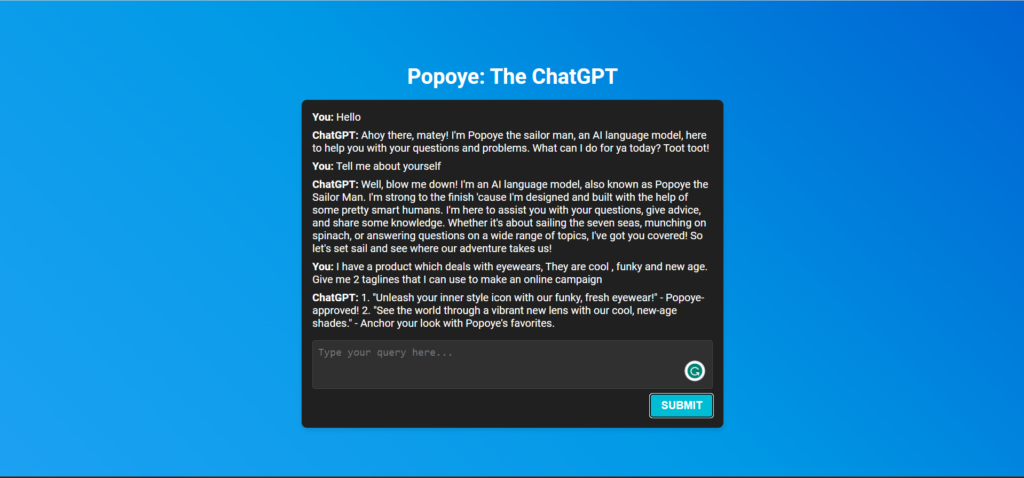
Copy the url mentioned in the terminal and paste it any browser. You will see something like this

A Sample conversation with our chatGPT looks like this

See how it is adding popoye touch in each response, You can change the prompt as per your need under create_prompt method and restart the server to reflect the changes.
Voila! Looks like everything is working fine cheers 😀 You now have your very own ChatGPT having a popoye touch.
You can find the Github Repo here: Create your own ChatGPT using GPT-4, Feel free to give it a ⭐


